Using the ZBar barcode scanning suite in the browser with WebAssembly
Posted on 2018-05-25
Contents:
I don’t have time for your dry prose, show me the code!
If you find any mistakes in the code or in this post, be sure to let me know! You can create an issue in the github repo or send me an email.
Goal
So I wanted to make a cross-platform barcode scanner for a research project involving inventory management. Ideally, it would end up being a simple library that could be used in the browser of a mid-tier smartphone. Some constraints:
- the scanner needed to be able to recognize multiple barcodes in one camera frame
- It would need to work with QR-codes, but also with the older, even more widespread one-dimensional barcodes (EAN-13/UPC-A, UPC-E, EAN-8, etc.), ideally using the same codebase and without user configuration.
Meet ZBar
To meet the requirements mentioned above, I looked at several Javascript libraries. There were several obvious contenders:
- QuaggaJs
- a very nice barcode scanner, however doesn’t do QR-codes out of the box.
- jsQR
- Performant, pure JS QR-code scanner with a easy to use API. Only scans QR-codes (and only one per image?).
- Instascan
- Nice Promise-based API, but only scans QR-codes. Powered by an Emscripten port of ZXing, so should theoretically be able to handle multiple 1D code formats with some hacking. However, this is not enabled by default.
When broadening my search for libraries by relaxing the ‘Javascript-only’ constraint, I quickly stumbled across ZBar, a battle-tested C library that is widely used for barcode scanning. It can work with multiple types of 1D and 2D (QR) barcodes and can detect multiple codes in a single frame.
Considering the fact that ZBar is a C library, I quickly found that some people had already been working on compiling it to Javascript for use in the browser. ZBarjs is a nice example, albeit scarcely documented. ZBarjs uses the amazing emscripten compiler to compile the LLVM bitcode derived from ZBar’s C-code to asm.js, a subset of Javascript aimed at improved performance.
Obviously, this being a ‘research’ project I figured I couldn’t just leave it at that. Why would I skip out of overengineering something with a new awesome technology?
Meet WebAssembly.
WebAssembly
WebAssembly is new and very shiny. WebAssembly is a low-level language for the browser that can be used as a compile target for LLVM languages ike C, C++, Rust, but also for example for TypeScript (using Assemblyscript/Binaryen), all the while promising near-native execution performance. All major browsers recently started supporting it.
I think the most awesome thing about WebAssembly is that it has the potential to make web development less dependent on Javascript, opening the realm of the browser up to the vast expertise and time-tested libraries of the languages in the LLVM ecosystem.
See here for an interesting series of posts by Mozilla on WebAssembly and its potential.
Using ZBar in WebAssembly
The need to use ZBar in the browser is a great excuse to try out WebAssembly and explore the nascent ecosystem surrounding it. Moreover, I might just be able to get some performance gains over using the asm.js version of ZBar (I will not go into any performance benchmarks in this post, maybe later).
Compiling a C function that uses ZBar to detect barcodes to a WebAssembly module is only slightly more complicated than compiling to asm.js, thanks to the magic of Emscripten.
Note that Emscripten also generates the JS/WebAssembly boilerplate needed to interface with your WebAssembly code. This makes Emscripten so much more than a simple C -> WebAssembly compiler.
Setting up our development environment
We need to have emscripten (emcc) available on our system. You can install emscripten locally by following these instructions, or, if you feel more like using a fast-food solution like I did at the time: use a Docker container as your build environment. I found trzeci/emscripten to be easy to use for this purpose.
Spin up the container, mount your local working directory as a volume (reachable at src) and enter a bash shell:
docker run -v $(pwd):/src -it trzeci/emscripten:1.39.0 /bin/bash
Before compiling ZBar, we need to quickly install some build dependencies. As I had to compile ZBar just once, I did not care that these installs would not be persisted.
In the trzeci/emscripten shell, run:
apt-get update && apt-get install autoconf libtool gettext autogen imagemagick libmagickcore-dev -y
Then we can finally start compiling ZBar from source (instructions partly adapted from zbarjs).
# cd into the mounted host directory
cd /src

# clone the latest ZBar code from the Github repo
git clone https://github.com/ZBar/ZBar

# cd into the directory
cd ZBar

# Delete all -Werror strings from configure.ac
# Don't treat warnings as errors!
sed -i "s/ -Werror//" $(pwd)/configure.ac

# Generate automake files
autoreconf -i

# Configure: disable all unneccesary features
# This may produce red error messages, but it is safe to ignore them (it assumes that
# emscripten is GCC and uses invalid parameters on it)
emconfigure ./configure --without-x --without-jpeg --without-imagemagick --without-npapi --without-gtk --without-python --without-qt --without-xshm --disable-video --disable-pthread

# Compile ZBar
emmake make
That should do the trick and leave you with a compiled library. Note that you should keep this container shell alive, as we will need it later.
Writing the C code to detect barcodes with
Lets write the C code that uses the ZBar library to detect barcodes in an image. We want to call these functions from the browser’s javascript environment later. The C-file, called scan.c, looks like this:
#include <stdlib.h>
#include <stdio.h>
#include <stdint.h>
#include <zbar.h>
#include "emscripten.h"

// External javascript function to pass the retrieved data to.
extern void js_output_result(const char *symbolName, const char *data, const int *polygon, const unsigned polysize);

zbar_image_scanner_t *scanner = NULL;

EMSCRIPTEN_KEEPALIVE
int scan_image(uint8_t *raw, int width, int height)
{
	// create the scanner
    scanner = zbar_image_scanner_create();

    // set the scanner density (function will have nonzero return code on error, check your browser console)
    printf("%d \n", zbar_image_scanner_set_config(scanner, 0, ZBAR_CFG_X_DENSITY, 1));
    printf("%d \n", zbar_image_scanner_set_config(scanner, 0, ZBAR_CFG_Y_DENSITY, 1));

	// hydrate a zbar image struct with the image data.
    zbar_image_t *image = zbar_image_create();
    zbar_image_set_format(image, zbar_fourcc('Y', '8', '0', '0'));
    zbar_image_set_size(image, width, height);
    zbar_image_set_data(image, raw, width * height, zbar_image_free_data);

	// scan the image for barcodes
    int n = zbar_scan_image(scanner, image);

	// Iterate over each detected barcode and extract its data and location
    const zbar_symbol_t *symbol = zbar_image_first_symbol(image);
    for (; symbol; symbol = zbar_symbol_next(symbol))
    {
        // Get the data encoded in the detected barcode.
        zbar_symbol_type_t typ = zbar_symbol_get_type(symbol);
        const char *data = zbar_symbol_get_data(symbol);

        // get the polygon describing the bounding box of the barcode in the image
        unsigned poly_size = zbar_symbol_get_loc_size(symbol);

        // return the polygon as a flat array.
        // (Parsing two-dimensional arrays from the wesm heap introduces unnecessary upstream code complexity)
        int poly[poly_size * 2];
        unsigned u = 0;
        for (unsigned p = 0; p < poly_size; p++)
        {
            poly[u] = zbar_symbol_get_loc_x(symbol, p);
            poly[u + 1] = zbar_symbol_get_loc_y(symbol, p);
            u += 2;
        }

        // Output the result to the javascript environment
        js_output_result(zbar_get_symbol_name(typ), data, poly, poly_size);
    }

	// clean up
    zbar_image_destroy(image);
    zbar_image_scanner_destroy(scanner);

    return (0);
}

// this function can be used from the javascript environment to
// allocate a buffer on the WebAssembly heap to accomodate the image that is to be scanned.
EMSCRIPTEN_KEEPALIVE
uint8_t *create_buffer(int width, int height)
{
    return malloc(width * height * 4 * sizeof(uint8_t));
}

// this function can be used from the javascript environment to free an image buffer.
EMSCRIPTEN_KEEPALIVE
void destroy_buffer(uint8_t *p)
{
    free(p);
}
Several things to note about this code:
- The
EMSCRIPTEN_KEEPALIVEmacro ensures that the functions are not eliminated by the compiler, as they are technically dead code (i.e. are not reachable from something like amain()function). - We mark the
js_output_resultfunction as an external symbol withextern. This function will be defined in the javascript glue code, and the Emscripten compiler will splice in a reference to this function at link time. - There is plenty of room for optimizations, like re-using the scanner across multiple images. Let’s not go into these now.
- This code showcases just one combination of methods to get data in and out of the WebAssembly environment from the browser JS environment. Several alternative methods can be found in the Emscripten documentation.
The Javascript ‘glue’ code
We’ll also create a file called library.js, in which we define the javascript functions that should be callable from the WebAssembly environment. Emscripten takes care of the nasty bits for us. If you want to read more, check out the emscripten docs on this topic. Note that in the below code, the Module and LibraryManager objects, along with the mergeInto function, are globals provided by Emscripten.
We define a single function: the one we use to extract data about the detected barcodes with. Important to note: before this function is called, a function should be set on the processResult key of the Module object. This is not a super elegant way to interface with your own code, but it suffices for now.
Our library.js file contains:
mergeInto(LibraryManager.library, {
    js_output_result: function (symbol, data, polygon, polygon_size) {
        // function provided by Emscripten to convert WASM heap string pointers to JS strings.
        const Pointer_stringify = Module["UTF8ToString"];

        // Note: new TypedArray(someBuffer) will create a new view onto the same memory chunk,
        // while new TypedArray(someTypedArray) will copy the data so the original can be freed.
        const resultView = new Int32Array(
            Module.HEAP32.buffer,
            polygon,
            polygon_size * 2
        );
        const coordinates = new Int32Array(resultView);

        // call the downstream processing function that should have been set by the client code
        const downstreamProcessor = Module["processResult"];
        if (downstreamProcessor == null) {
            throw new Error("No downstream processing function set");
        }
        downstreamProcessor(
            Pointer_stringify(symbol),
            Pointer_stringify(data),
            coordinates
        );
    }
});
Compiling our code to a WebAssembly module
From your build container shell (trzeci/emscripten, see above) run the following command:
emcc -O3 -s WASM=1 \
--js-library ./library.js \
-s EXTRA_EXPORTED_RUNTIME_METHODS='["cwrap", "UTF8ToString"]' \
-I `pwd`/ZBar/include ./scan.c ./ZBar/zbar/.libs/libzbar.a
A quick rundown of this command:
emcccalls emscripten- The
-O3flag tells the compiler to produce highly optimized WebAssembly and Javascript code. -s WASM=1tellsemccto produce WebAssembly—js-librarytells emscripten where it can find your Javascript glue code-s EXTRA_EXPORTED_RUNTIME_METHODStells Emscripten to inject theModuleglobal in the javascript environment with these two utility functions.crwapallows us to call our C functions andPointer_stringifywill help with moving data from the WebAssembly runtime to JS.-Itells it which C libs/code to compile
This should produce the following files:
a.out.js, containing the nicely packaged javascript glue code (thanks emscripten!)a.out.wasmcontaining the WebAssembly module
Testing our barcode scanner
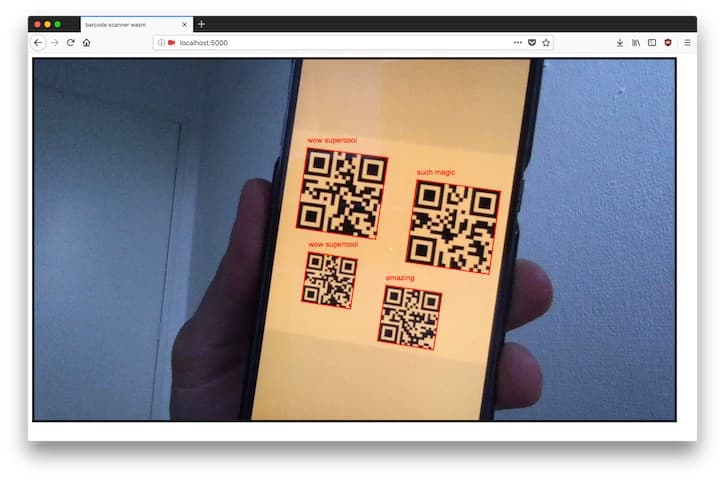
To test our barcode scanning module, lets write a simple index.html that opens up a webcam feed and passes image frames to our scanner module and, when a barcode is found, draws its bounding box and the barcode content to a canvas.
Note that I also included a step for converting the image data to grayscale using a quick bit shifting hack. I expect that this operation can be implemented in a more performant way with WebAssembly, but lets not worry about this right now.
You are going to need to run a quick ad-hoc static file server to run test everything in your browser. I am a big fan of the minimalist tool serve.
Important: make sure your webserver sets the Content-Type header for the .wasm file correctly. Firefox 58 apparently follows this part of the WebAssembly spec to the letter and will refuse to compile the .wasm file, causing the Emscripten glue to fall back to a slow polyfill. The latest version of serve handles this properly.
index.html
<!DOCTYPE html>
<html lang="en">

<head>
	<meta charset="UTF-8">
	<title>barcode scanner wasm</title>
</head>

<!-- We create some DOM elements necessary for grabbing webcam frames -->
<body>
	<div>
		<!-- note that we hide the live video element using 'display:none', that way only the canvas is rendered -->
		<video id="live" width="320" height="240" autoplay style="border:5px solid #000000; display:none;"> </video>
		<canvas id="canvas" style="border:5px solid #000000"> </canvas>
	</div>

</body>

<!-- Import the javascript bundle produced by Emscripten-->
<script src="/a.out.js"></script>

<!-- The main 'application code' tying it all together -->
<script>

// Execute the application code when the WebAssembly module is ready.
Module.onRuntimeInitialized = async _ => {

// wrap all C functions using cwrap. Note that we have to provide crwap with the function signature.
const api = {
	scan_image: Module.cwrap('scan_image', '', ['number', 'number', 'number']),
	create_buffer: Module.cwrap('create_buffer', 'number', ['number', 'number']),
	destroy_buffer: Module.cwrap('destroy_buffer', '', ['number']),
};

const video = document.getElementById("live");
const canvas = document.getElementById("canvas");
const ctx = canvas.getContext('2d');
const desiredWidth = 1280;
const desiredHeight = 720;

// settings for the getUserMedia call
const constraints = {
	video: {
		// the browser will try to honor this resolution, but it may end up being lower.
		width: desiredWidth,
		height: desiredHeight
	}
};

// open the webcam stream
navigator.mediaDevices.getUserMedia(constraints).then((stream) => {
	// stream is a MediaStream object
	video.srcObject = stream;
	video.play();

	// tell the canvas which resolution we ended up getting from the webcam
	const track = stream.getVideoTracks()[0];
	const actualSettings = track.getSettings();
	console.log(actualSettings.width, actualSettings.height)
	canvas.width = actualSettings.width;
	canvas.height = actualSettings.height;

	// every k milliseconds, we draw the contents of the video to the canvas and run the detector.
	const timer = setInterval(detectSymbols, 250);

}).catch((e) => {
	throw e
});

function detectSymbols() {
	// grab a frame from the media source and draw it to the canvas
	ctx.drawImage(video, 0, 0, canvas.width, canvas.height);

	// get the image data from the canvas
	const image = ctx.getImageData(0, 0, canvas.width, canvas.height)

	// convert the image data to grayscale
	const grayData = []
	const d = image.data;
	for (var i = 0, j = 0; i < d.length; i += 4, j++) {
		grayData[j] = (d[i] * 66 + d[i + 1] * 129 + d[i + 2] * 25 + 4096) >> 8;
	}

	// put the data into the allocated buffer on the wasm heap.
	const p = api.create_buffer(image.width, image.height);
	Module.HEAP8.set(grayData, p);

	// call the scanner function
	api.scan_image(p, image.width, image.height)

	// clean up
    //(this is not really necessary in this example as we could reuse the buffer, but is used to demonstrate how you can manage Wasm heap memory from the js environment)
	api.destroy_buffer(p);

}

function drawPoly(ctx, poly) {
// drawPoly expects a flat array of coordinates forming a polygon (e.g. [x1,y1,x2,y2,... etc])
	ctx.beginPath();
	ctx.moveTo(poly[0], poly[1]);
	for (item = 2; item < poly.length - 1; item += 2) { ctx.lineTo(poly[item], poly[item + 1]) }

	ctx.lineWidth = 2;
	ctx.strokeStyle = "#FF0000";
	ctx.closePath();
	ctx.stroke();
}

// render the string contained in the barcode as text on the canvas
function renderData(ctx, data, x, y) {
	ctx.font = "15px Arial";
	ctx.fillStyle = "red";
	ctx.fillText(data, x, y);
}

// set the function that should be called whenever a barcode is detected
Module['processResult'] = (symbol, data, polygon) => {
	console.log("Data liberated from WASM heap:")
	console.log(symbol)
	console.log(data)
	console.log(polygon)

	// draw the bounding polygon
	drawPoly(ctx, polygon)

	// render the data at the first coordinate of the polygon
	renderData(ctx, data, polygon[0], polygon[1] - 10)
}

}
</script>

</html>
Conclusions
There we have it, we compiled some C code that uses ZBar to WebAssembly, wrote some Javascript glue code, and ended up with a nice in-browser barcode scanner. Thanks to ZBar, our scanner is compatible with a wide range of barcode types and can detect multiple codes in a single image frame.
Some things need work, however:
- Performance is not fantastic yet. There are a few really obvious optimizations that can be applied, though, and I may go into optimizing the scanner in a next post. In short, I would first look at:
- better memory management at the WebAssembly level (destruction of the buffers, re-using the scanner.)
- In a more complex application, I would definitely offload as much work as possible (e.g. the WebAssembly/JS interop) to a web worker.
- Feeding of webcam frames to the WebAssembly heap can be optimzed. First rendering each frame to a canvas seems convoluted, but I haven’t really quantified this overhead. Currently this is the only way I know of…
- Try all (combinations of) compiler optimizations. Emscripten features a pretty serious collection of compiler optimizations at various levels.
- Reducing the resolution of the input images vastly improves performance. I would like to know what kind of impact this has on the distance at which QR codes can be detected.
- The scanner requires barcodes to have a pretty high resolution before it can detect them. This limits detection to barcodes that are near the camera. I don’t necessarily expect other implementations to outperform ours on this point, as I think we are running into the base resolution requirements of confident QR-code detection. There may be some knobs inside ZBar that can be turned to reduce the resolution requirement by sacrificing decoding fidelity, but I didn’t have the time to look into that yet.
- Even with the help of Emscripten, the interoperability between Javascript and WebAssembly still has quite a bit of a learning curve to it. However, I expect a lot of nice abstraction layers to be developed as the technology matures.
- In the future, access to DOM APIs from WebAssembly may obviate the need for performance critical interactions with Javascript glue code. That would be a game changer.
In conclusion, this project was a great way to explore the basics of using WebAssembly. Moreover, it showed a glimpse of a future in which we can use WebAssembly to leverage the huge ecosystem of C (and other LLVM languages) to build richer and more performant applications for the web.
If you find any mistakes in the code or in this post, be sure to let me know! You can create an issue in the github repo or send me an email.


